Reverse Engineered Cookies

So, 2020?  What’s new?  Not much, other than the world coming to a stop over a pandemic and a whole lot of turmoil, right?  <sigh>

Yes, 2020 has been a crazy, scary, insane year for so many folks.  During all of the madness, I squeezed in a day off from work to catch my breath.  What did I end up doing?  Going for a hike?  Nope.  Bingewatching something?  Nope.  Sleeping in?  Nope (thanks to our dog).  I leaned into my baking nerd-dom and retreated to our kitchen, inspired by an info graphic in the Penn State alumni magazine that had just arrived.  Say what?  Naturally, there’s a story behind it all…

Infographic that Started it All

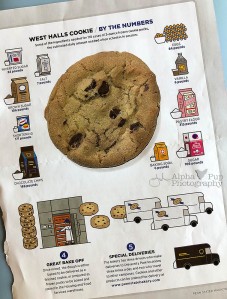
Mindlessly leafing through the alumni magazine over my morning coffee, a full-page infographic on what it goes into the daily batch of West Halls chocolate chip cookies caught my eye.  Considering these cookies feed all of main campus and get sent of to some branch campuses, the volumes of the ingredients was pretty eye-popping.

I didn’t think much of it at the time other than it was interesting.  Then, the wannabe baker in my brain sprang to life a few hours later.  What if I could reverse engineer a recipe from that infographic?  All it would take would be a whole lot of math and applying some basic cookie-making knowledge.  With all of the stress around us with the pandemic and life in general, making a batch of chocolate chip cookies sounded like just the thing my soul needed.  If it exercised some brainpower along the way, so be it.

Off to the kitchen I went to scale down this massive recipe to something a little more appropriately sized for a family.  Like any good baking recipe, the ingredients in the info graphic were listed by weight – a very good place to start.  But what about the odd things like 84 pounds of eggs?  How many eggs is that?  How do I scale that down?

That’s when the science nerd in me kicked in.  We happened to have an untouched dozen of eggs in the fridge, so I weighed each egg in the dozen to come up with an average egg’s weight, applied the math to scale it down, and boom – there’s my starting point!  I figured out approximately how many eggs were in 84 pounds, then built my recipe around using 2 eggs.  (For those of you wondering, 84 lbs. of eggs is about 648 large eggs!)  My recipe would represent roughly 1/325th of what the infographic would make!

As much as I love baking using weight measures instead of volume measures, I still had to convert some items from weight to volume.  Six pounds of vanilla is way more than I use in several years, so how much should I use for a recipe 1/325th Show Your Workof the original size?  I got scientific again, weighing out a teaspoon’s measure of vanilla, noting its weight, and took an average.  Rinse and repeat for several other ingredients.  Tedious work, but it’s all about accuracy!

Lastly, I had to figure out what some of the ingredients were in the first place.  Inverted sugar?  Never heard of it.  (It acts like corn syrup to stabilize food.)  What makes pastry flour special?  (It’s a higher protein content in the flour.)  What’s a good substitute that I might have in the house already (since I can’t go to the store due to the pandemic)?  Interwebs to the rescue!

With all of the math and ingredient research done, the pantry raided for some simple substitutes, next up was to figure out the mixing method.  Naturally, that wasn’t part of the info graphic.  No worries though as we’re fans of Alton Brown & Good Eats, so I had a treasure trove of knowledge on a bookshelf to consult.  I decided to apply “The Chewy” method from the Good Eats episode about – what else? – chocolate chip cookies.

For my first attempt at making this reverse-engineered recipe – which was currently scrawled all over random notepaper – I made half a batch.  Eighteen cookies would be more than plenty for us.  If they turned out well, great!  If not, fine by us too because we’d still eat a gooey mess of sugar and chocolate.  (We’re not picky.)

I baked one tray of cookies at a time, carefully trying (and noting!) different cooking times, tray positions, and so on.  Lo and behold, the maiden voyage of this new recipe turned out really well!

PSU Cookies - First BatchI was feeling proud of my accomplishment that day, so I tweeted out a pic of my nerdy baking feat.  That caught the eye of the alumni magazine staff & they asked to use my picture in the next issue!  Pretty cool!

As the weeks went by, I kept thinking about where I could improve the recipe more to my liking.  I was intrigued by changing the fat.  Everything tastes better with butter, right?  What if I swap the shortening for butter?  Time for another test batch and – let me tell you – that butter swap made for some really thin, puddly cookies.  They tasted fine, but were a little on the ugly side.

I made a few more test batches, finally settling on a half-and-half mixture of butter and shortening to split the difference to achieve the flavor I wanted with fewer puddles when the cookies baked.   I also used dark chocolate chips to cut back on the sweetness a little and ditched the little bit of corn syrup since there was no need to stabilize the dough for mass distribution purposes like PSU does.

When I felt I had the recipe dialed in, I had my husband – who likes to cook and hates to bake – give the it a final test run.  His batch of cookies turned out great, so I knew the recipe was set!Final Test Batch

It was quite a journey from the infographic page to the plate.  If you’ve read this far, you deserve to be rewarded.  While I can’t give you an actual cookie, I can share the final recipe and you can make the cookies yourself!!

Enjoy!

– JC

Penn State Cookie Recipe

Yield:  One batch makes 36 cookies that are 3 ½-4” in diameter.

Wet Ingredients

300g granulated sugar (approximately 1 ½ cups)

300g light brown sugar (approximately 1 1/3 cups, packed)

120g shortening (approximately 2/3 cup)

120g unsalted butter, softened (approximately 1 stick + ½ tablespoon)

2 teaspoons vanilla

2 large eggs

Dry Ingredients

220g all-purpose flour (approximately 1 1/3 cups + 3 tablespoons)

220g cake flour (approximately 1 1/3 cups + 3 tablespoons)

1 ½ teaspoons salt

1 ½ teaspoons baking soda

240g dark chocolate chips (approximately 1 1/3 cups)

Directions

Beat sugar, light brown sugar, shortening, & butter in a stand mixer with the paddle attachment at medium speed until well blended and a little fluffy.  Add the vanilla and eggs.  Mix to combine.

Note:  You can mix this recipe by hand with a large fork and enough arm power!

Sift together the all-purpose flour, cake flour, salt, and baking soda.  Add the sifted ingredients to the sugar/egg mixture in 3 parts, mixing just enough to combine after each addition.

Add chocolate chips and mix until incorporated.

Remove the bowl from the mixer, cover with plastic wrap, and chill for 1 hour.

Preheat the oven to 375° with an oven rack in the middle position.

Line a baking sheet with parchment paper.  Scoop the chilled dough in 43g portions (approximately 2 ¼ tablespoon) and form into a loose ball shape.  Place the dough balls on the baking sheet with 2-3” of space between each cookie.  (6 cookies fit nicely on a half sheet pan.)

Bake for 12-14 minutes, rotating the pan halfway through the baking time.  The cookies are done when they are slightly golden in color around the edges.

Remove the pan from the oven.  Immediately transfer the cookies on the parchment paper to a rack to cool.

Note:  The center of the cookies will still be soft when they come out of the oven, making them hard to transfer to a cooling rack with a lifter or spatula.  Transferring the cookies on the parchment paper to the cooling rack is quick and easy, while also helping the cookies keep their shape.

Cool for 5-10 minutes.  Remove the cookies from the parchment paper and leave on the rack to cool completely.  Store cooled cookies in an airtight container.

Note:  When the cookies are completely cooled, the edges will be crispy, while the middle will be a little soft and chewy.

Until Next Time

During our entire stay at Great Sand Dunes National Park we had late-day clouds & sprinkles move in each day.  The bad part about that was that the clouds rolled in right around the prime-time for afternoon shadow madness on the dune field.  The good part about that was that if the skies cleared just enough to let some sun through, it setup things up for some pretty sunsets.

The first two nights the most spectacular parts of the sunsets were sudden and fleeting, so I simply sat back and enjoyed.  On our last night though, things moved more slowly and I was able to capture a quick glimpse of the sunset – complete with a wisp of the rising moon – using the camera on my cell phone.

Wisp of a Moon

Come the next morning, a few clouds were still hanging around out to the west, potentially setting things up for an interesting sunrise.  Because the park is nestled into the base of the southern end of the Sangre de Cristo mountains, you don’t get a ton of light on the dunes themselves as the sun comes up.  It takes about an hour for the sun to get over the peaks to the east and hit the sand, so by that time “golden hour” is over and the light is already getting flat.  Maybe these tufts of clouds could help make things more interesting than usual?  Hmmmm….

As we were having a quick breakfast and preparing to break camp to return to everyday life, the sun started glinting off of those tufts of clouds creating a little pink in the sky.  I used my cell phone camera again for the sake of quickness and commemorated the rosy sky farewell Dunes made for us.

Red Virga Morning

So, until next year (or sooner) Dunes…

– JC


Adventures Around Alamosa

The centerpiece attraction on the second day of our grip to Great Sand Dunes was actually in Alamosa… involving beer (of course!).  During the course of doing research for something at work, my husband discovered a new brewery outside of Alamosa that essentially is a farm-to-table brewery.  They grow as many of the ingredients for their beer on their farm and serve it in their taproom on-site.  Pretty cool concept, especially as it pertains to both agriculture tourism and beer geekdom!


Based on the hours they’d be open, we decided to spend the morning at the Alamosa National Wildlife Refuge just to the east of town.  We’ve driven by it so many times and never made the turn to check it out, so it seemed like something fun to do.  We weren’t sure what we’d see once we got back there, but if nothing else we’d get a good walk/hike out of it.


The parking lot at the Refuge was empty aside from a lone person who rode in on his mountain bike.  Empty trail heads are a wonderful sight, since they often mean the trails aren’t crowded!  The refuge had a loop that you could drive or a nature trail that ran along an irrigation ditch that you could walk for a couple of miles.  Walking sounded good, so off we went down the nature trail.


The views of the San Luis Valley, the mountains, and the Dunes were beautiful.  It was nice for us to get a different perspective on the scenery in a literal sense since we were looking at sites we’re so familiar with from a few miles further south than where we usually hang.


Prairie Mountain View


The one drawback to this walk along the irrigation ditch was that it was full of water.  Water means there’s bugs.  And we’re not talking just any bugs… crazy-big biting horseflies.  The flies would not leave me alone.  They generally left my husband alone, but not me.  At points some were trying to bite me through my hiking leggings!  I gutted it out as best as I could, but it was getting nuts between bites that were swelling up and swatting at myself constantly all while wearing my pack with my big camera strapped to the front.  My husband even started walking behind me to help swat them off of my back because it was getting that insane!


Given the personal insect invasion I was experiencing, I was walking at a pretty good clip to get back to the trail head.  I had my hiking boots on since the trail wasn’t perfectly clear and had a fair amount of tall grass & sticks along the way, though the boots weren’t laced up all the way to the hooks above my ankle as I normally do when I don’t need the extra ankle support.  (Do you sense disaster coming yet?)


Well, we got to about 100-150 yards from the parking lot.  Shelter from the biting flies was in sight!  That’s when the loop on the shoelace of my right boot caught in the unused hook of my left boot, quickly changing my stride length from a couple of feet to less than 6 inches in an instant.  I managed 1 or 2 stumbling steps in an attempt to catch myself, but the momentum was too much.  I went down.  Hard…. with my big camera hooked to the straps of my backpack.


My left knee took the brunt of the impact, but I was more concerned about what impact my camera took.  I was uber fortunate because – somehow – I managed to turn my camera just enough that it took the impact towards the end of my 24-70 prime lens that had a polarizer on it.  A little dirty, maybe a scratched filter, but both the camera and lens were still working without any problems!  Huge sigh of relief… now let’s see how bad the knee is and if I can walk.  (Yes, my priorities are a little whacked sometimes when it comes to my camera.)


Unbelievably, my hiking leggings weren’t ripped open.  I thought for sure they’d be in tatters with a really badly scraped knee and other assorted bruises.  So I rolled my pant leg up to check the damage and – amazingly – not bad, at least in terms of open wounds.  However, from the throbbing, I knew I hit right on the top of the shin bone at my knee, so I figured I’d be in for a colorful souvenir from this trip within the next day or so.  Time to hobble back to the car for some preliminary first aid.  Needless to say, hiking for the day (and maybe the weekend) was over.


We drove into Alamosa and picked up an ice pack and a bandage to try to keep the swelling at bay as we still had another night of camping at Dunes ahead of us.  So this became my fashionable look for the rest of the weekend:


Clumsy Casualty


With my gimpy leg, the options for activities were limited, so we did what we do best – found a new place to eat and have adult beverages!  We drove further west to Del Norte (pronounced “Del Nort” by the locals) to a brewery recommended to us mainly for its pizza.  We were not led astray – the pizza was fabulous and the beer was really good too.  Another great food find in south central Colorado!


Eventually, we ended up at our main destination at the Colorado Farm Brewery and it did not disappoint.  They can’t always grow every single ingredient they need for their beers, but they do grow as much as they possibly can.  (Some varieties of hops, in particular, are tricky to grow in Colorado.)  They did have a beer that was made with only ingredients from the farm and it was really good.  The scenery from the patio at the taproom wasn’t too shabby either.  The combo was exactly what I needed for a relaxing afternoon after my clumsy/semi-dramatic start to the day’s adventures!


Ingredients to Glass


– JC

Treasure Hunting

Our annual late-summer trip to Great Sand Dunes National Park came and went entirely too fast yet again this year.  The funny thing about this trip was that we didn’t spend as much time in the park as we normally do since we chose to do some exploring in the San Luis Valley area.  (More on those adventures to come in future posts.)  The time we did spend hiking in the sand field turned into a little bit of photographic treasure hunting for me.
I always say that I can find something new to take pictures of at Dunes every time we go.  It’s one of the reasons I love it so much down there.  This year’s yield of pictures wasn’t as plentiful as years past, but I did come across some fun stuff.
The first find was an awesomely sharp sand ridge that created lines and shadows in the morning sun that I couldn’t look away from.  I took quite a few shots of this one ridge, playing with angles and framing.  In the end, I kept two of the shots since I couldn’t decide which I liked more – the horizontal or vertical version.  Both had their merits, and I can foresee printing one of these for display in some way in our house down the road.
The next find was a piece of weathered wood laying atop a different ridge of sand.  It caught my eye from a distance because it reminded me of conch shells I’d find on the beach growing up on the east coast.  I knew it couldn’t be a shell, though I had to check it out.  I was happy that I did as it gave me a chance to fiddle with different depths of focus to try and get the shot just right.
Desert Conch
The last find of the hike is what you’d expect if you’ve been visiting Alpha Pup Photography for any length of time – a prairie sunflower.  The bloom was still in full swing during our trip, so there was ample opportunity to find just the right shot.  This one ended up being my favorite…
Summer Sunshine
It was a good morning on the Dunes with some typical sites and some not-so-typical finds.  Certainly a great way to start our trip before venturing further out into the Valley in the days to come…


– JC

Holy Cacti & Succulents, Batman!

We spent the last day of our trip in the Phoenix area before heading back to home base in Colorado.  We weren’t sure what we’d do with the day, that is until my husband got on the interwebs as the trip got closer and found the Desert Botanical Gardens were not far from where we were staying.  Since he’s a desert/cactus/succulent/nature nerd (and I mean that in the best and most loving way!), it seemed like a good way to spend our day.

We arrived at the gardens not long after they opened, only expecting to spend a couple of hours there and then head off to do something else.  Boy, were we wrong!  The Gardens were so much bigger than we realized with tons to see, starting from the get-go with a gorgeous mix of cacti and succulents greeting you just after the entrance.

Cactus Wonderland Awaits

Admittedly, I screwed up a little by not checking out their camera & tripod policies prior to arriving.  Knowing that many botanical gardens have restrictions on cameras – especially with tripods – I played it safe and only brought my phone.  To say I started kicking myself for that mistake immediately is an understatement!  Not long after we arrived, I was seeing all kinds of macro shots I wanted to take.  Then I saw folks coming in with tripod setups!  Blerg!  I did what I could with the camera on my phone during the day.  Guess we’ll just have to go back!  (Oh darn.)

Putting my camera mis-planning aside, we dove in.  There were so many cool things to see.  There’s gobs of variety – a lot of the species of plants in the complex are native to Arizona and they have a lot of non-native species too.  The Gardens are setup as a central hub with desert plants, then 4 or 5 different loop trails shoot off of that main hub.  One loop takes you through wildflowers native to the area (though we were a few weeks too early for the bloom), another takes you on a nature trail, etc.  It was a really nice setup that lent itself to leisurely wandering and taking it all in at our own pace.

Along the way we ran into several awesome docents who filled us in on the different plants around us, how the plants function in the desert, and so on.  It also happened to be a bird watching day at the Gardens, so there were a lot of folks running around with binoculars trying to spot what types of birds were passing through.  A few of the birders chatted us up, adding to our knowledge of the creatures in this part of the southwestern desert.

The Gardens did have a few art pieces mixed in along the way.  My 2 favorites were representations of cacti.  The first piece was a sculpture made of the iron spikes that are part of a cactus transplant system developed back in the 30s (if I recall correctly) that’s still in use today to preserve native cacti when they need to be relocated due to construction.  The other piece was a Chihuly glass sculpture near the entrance that was sparkling brilliantly as we left.  My mother-in-law makes stained glass and fused glass pieces as a hobby, and generally loves anything related to glass.  Thanks to her, I knew those had to be Chihuly pieces because it fit both in style and placement when I think of his work.

We spent a considerable part of our day at the Desert Botanic Gardens, so there wasn’t much time to do anything else in Phoenix other than to grab a bite and try some more of the local beer before going home.  That’s when I happened upon a near-match of an all-time favorite beer of mine that’s been out of production for 2 years now, so the beer quest was a massive success in my book!  (Thank you McFate’s for ending our trip on that tasty note!!)

– JC

Everybody Wants to be Ansel Adams (Including Me)

I’m betting that just about everybody who’s seen a black & white landscape picture has silently and sarcastically thought to themselves, “Nice job, Ansel Adams-wanna be.”  I know I’m guilty of it, even with my own shots.  But there’s gobs of reasons his name is synonymous with black & white nature photography – he took a lot of damn good shots and did some groundbreaking work in the field in terms of technique!

Maybe it’s because Adams’ work was mainstream in the sense that it appeared in places other than just the fanciest museums so I was exposed to it a little more often, but I usually prefer black & white landscape shots to those in color.  Don’t get me wrong – color landscape photography can be really amazing.  But, I deal in reality and my reality/luck is that I’m rarely in the right spot at the right time with the utterly perfectly dramatic conditions to get a National Geographic-worthy color shot no matter how hard I try.  So instead, I work to find something interesting about the scene nature’s put in front of me, even if it’s not readily apparent the moment I take the picture.

It may sound silly, but that was definitely the case at the Grand Canyon.  That vast swath of land is so beautiful I still can’t find words to do it justice.  It’s also really hard to capture it in a way that conveys both its magnitude and its beauty.  So, instead of frustrating myself with not-quite-ideal conditions, I made the best of what I had.  Turns out, the best of what I got was on our way back to Phoenix at the end of our stay in the park.

The morning we left, we decided to head further east towards Desert View Tower to get a different vantage point on the Grand Canyon.  The 25-mile drive out to Desert View Tower had quite a few places were you could stop and look out over the rim.  What was cool for us was that, after spending 3 days in the Village looking north out into the Canyon and across to the North Rim, this drive put us more towards the eastern side so we were looking up the Canyon to the west, more in line with how the Colorado River flows through it.  Because it was mid-morning, the light was just about right to keep things bright, yet still have some dramatic shadows in play, so I activated my inner Ansel Adams and got to work.

I normally shoot my black & white shots in color first, then convert them to black & white later during post-processing.  Even in cases when the color is a bit blah due to flat light, I find I can manipulate the monochrome version more easily to get make things come out the way I want it.  Using this approach over the years, I’ve built up a sense for what I think would make a good black & white shot based on the Technicolor version in front of me when I initially take the picture.  That helps me think through the shooting process to get interesting or dramatic shots.  When I get home to review and process the images, sometimes I surprise even myself in terms of what I can come up with in black & white.

Here’s 3 examples from this trip alone where I was really surprised with how much better I thought things looked in black & white instead of color.  Each is presented in a slide show so you can see what I saw when I took the picture versus how it changed when I converted to black & white.

This slideshow requires JavaScript.

This slideshow requires JavaScript.

This slideshow requires JavaScript.

This slideshow requires JavaScript.

Ansel Adams was definitely onto something all those years ago, so I’ll keep channeling him on occasion when it comes to my own landscape & nature photography.

– JC

Down is Optional, Up is Mandatory

No truer words have ever been spoken when it comes to canyon hiking.  When you’re hiking up mountains, the harder part of the day is usually the climb, but at least that’s the first part of your day when your legs are fresher.  Coming down can still be tough, but at least you’re working with gravity instead of against it.

Canyon hiking is the exact opposite.  Your day starts with the “easy” downward trek, but then you have to climb up and out to finish the day when you’re at your most exhausted.  The canyons I’ve hiked have been in hot desert climates, so that makes the exhaustion all the worse on the way back up if you’re not careful.

Whether it’s mountain or canyon hiking, it’s still worth it even though there’s different physical and mental challenges involved.

On our 2nd full day in Grand Canyon National Park, it was finally time to dive into the Canyon a little.  Before we did, I had to get out to try for sunrise shots again though.  I’m happy to say the weather cooperated a bit better than the day before!

Second Sunrise

Our plan was to head down the Bright Angel trail as far as we could reasonably go on a winter day hike.  We fueled up with a good breakfast, grabbed our gear, and off we went.

Trail conditions weren’t too bad, though we found ourselves walking on snow and ice for the first 1.5 miles of the trail.  Thankfully, we brought our traction devices to shore up our footing, though that didn’t mean we could blaze down the trail.  It was slick and steep enough that one slip in the wrong place and – whoop! – you’d be off the trail and taking a really bad downward plunge.

The Descent Begins

A little ways down the trail, we came across what may be one of the most amusing – and useful – signs we’ve ever seen in our hiking travels.  Aside from providing important safety info to novice hikers thinking they could slay the Canyon on an easy long walk, we enjoyed the artwork.  My husband correctly pointed out that the National Park Service probably commissioned someone draw that puking hiker on the sign.  That thought gave us a good laugh.

It's a Sign

Our goal at the start of the day was modest – just make it down to the 1.5 Mile outpost that’s – you guessed it – about 1.5 miles from the trailhead.  Not knowing what the trail conditions would be or how steep the decent would be, it seemed like a reasonable goal.  I think we shocked ourselves when we made it that far in good time, even though I was snapping away during the hike as the lighting and shadows changed on our view of the Canyon.

Immense

Pleasantly surprised by how good we felt, the trail conditions, and the time we made, we decided to plunge onward and shoot for the 3 Mile outpost.  (Yes, about 3 miles from the trailhead.  Such creative naming conventions!)

We arrived just in time for a spot of lunch and for the lighting and shadows to go flat on the Canyon.  That didn’t mean I didn’t take a picture though because we came across another new trail sign favorite that inspired this post… down is optional, up is mandatory.  So succinct and so true!  I couldn’t leave without snagging a shot of that sign.

Hiking Truth

We were still feeling good after lunch and the weather was still pretty stellar.  As much as we were tempted to press on a little further down into the Canyon, we decided to be smart and head back up.  It was a looonnnngggg, steep, slick, mushy climb, but we made it back out with relative ease.   We even found a fossil in rock along the way!

Tiny Footprints

We weren’t sure how far we descended into the Canyon in terms of altitude on the way down, but when we reached the top my watch estimated we had climbed up over 2200 feet in elevation over those 3 miles of trail!  They say the Canyon is, on average, 1 mile deep, so we made it a little shy of halfway down to the Canyon floor.

Once we got back to the trailhead on the rim, we got some perspective on how far down we went because we could see the 3 Mile outpost.  Yeah, it’s a ways down there!  (The oval is an approximation of where the 3 Mile resthouse is along the trail.)

3 Mile Resthouse (Approximate)

Maybe next trip we’ll get a little more ambitious and climb further down this trail or a different path.  For my first journey into the Grand Canyon itself, it was a pretty awesome day!

– JC

PS – The Canyon treated us to a pretty spectacular sunset as the cherry on top of our day.  We even came across a little snowman family someone had made, complete with bits of carrot for the noses!

Improving Impressions

Waking up at the Grand Canyon to start our first full day in the park meant getting up early for some sunrise shots.  The forecast was iffy, so we weren’t sure if we’d see any sun that early, but I was willing to try in spite of the snow showers lingering from the night before.

The best part of shooting sunrises in winter is getting to sleep in a little later than you would for a summer sunrise.  Yay short days and long nights!  Sure, the cold isn’t fun, but that’s the trade-off.  I also find the cold scares a lot of people off, so I have a better chance of shooting what I want, from an angle I want, without crowds.

On this particular morning, my impressions of the Grand Canyon started to improve and line up more with my expectations.  The weather wasn’t ideal, but with a hint of sunlight brightening the clouds of the snow squall moving through just before the sun broke the horizon, I had a funky blueish, moody light to start the day.  If nothing else, we could see a lot more of the Canyon than I could the previous afternoon when we arrived!

Knowing I’d have 2 more mornings to hope for better weather, we didn’t stay out long.  What started as snow showers turned into a wind-driven snow/sleet combo that stung as it hit your face.  It also meant a lot of lens cleaning, so that was it for the day’s sunrise shooting session.

We bugged out and warmed-up over breakfast, then set back out to check out trail conditions and ease our way into whatever we were going to make of the day.  All it took was a few hours after sunrise for the weather to start clearing and yes – the angels finally started singing and the Canyon looked like what I had imagined, and far surpassed any expectation I had of it!

Clearly Big

Our day found us keeping it simple by hanging out and taking a long walk around the trail along the South Rim.  It seemed like every few feet when I stopped to take a peek, my jaw dropped further and further in amazement of the geological feat in front of me.

Though I took a fair number of pictures that morning, when I got home and sorted through my shots, I realized that so many of them looked the same.  Then it dawned on me – even though we walked probably 3 miles or so along the rim, the Canyon is just so big that changing your viewpoint by a mile or two doesn’t drastically affect the perspective in a picture!  The only things really changing were the clouds in the sky and the shadows on the ridges in the Canyon.  Still, I couldn’t complain because it’s just stunning to see.

After our morning spent along the rim, we wandered into the woods and walked some of the greenways that cut through the park connecting different parts of Grand Canyon Village.  Under normal circumstances, when the government is operating (argh shutdown!), you can rent bikes to cruise all over the Village along these pathways through groves of ponderosa pines and junipers.  It made for a nice wintry walk to bookend our day.

As we wandered back to our lodge, we passed the Grand Canyon’s train station.  The Grand Canyon Railway has a long history – predating the establishment of the park itself!

We didn’t ride the train, but it was parked at the station, having recently arrived for the day’s trip up from Williams, AZ about 65 miles away.  Maybe next trip to the Grand Canyon we’ll go for a ride ourselves.

With our first full day at the park nearing an end, we called it a day.  Tomorrow was shaping up to be a long one since we planned to get down into the Canyon as long as weather and trail conditions cooperated.


– JC

Delayed First Impressions

They say that first impressions mean a lot.  Whether it’s a person or a place or an experience, it sticks with you.  For my first-ever trip to the Grand Canyon, I was expecting a big “AAAAAHHHHH…” moment with the sound of angels singing as I laid my eyes on that majesty for the first time.  Alas, that moment would have to wait – just my luck!

Our trip to the Grand Canyon’s South Rim was a little semi-last-minute journey we decided to take since my husband’s birthday fell on a weekend – an excellent excuse to get away with what little vacation time we had available from our “regular” jobs.  We were both unlucky and lucky in the timing and location we chose because we booked the trip before the US government shutdown happened (unlucky), but the state of Arizona bailed us out (lucky)!!  (The state provided funding for basic services at Grand Canyon National Park because they recognize it’s so vital to their economy – even in winter.)

We weren’t sure what to expect because of all of the uncertainty caused by the political garbage going on.  There was also weather to consider.  Heading into the trip, there was a good chance we’d get caught in a storm on the 3-4 hour drive up from Phoenix.  That’s where luck struck again and the storm hit 2 days before we got there, meaning the roads were clear, even if the skies continued to look threatening.  We tried to stay positive, even though we were a little leery of how all of this was going to go.

Thankfully, travel went as planned and we got to the park about mid-afternoon… just as rain started to come down.  The park rangers were working at the entrances to hand out maps & info.  (They weren’t allowed to collect the entrance fees that help support the park.)  As the ranger handed us our map, she said we should hustle if we wanted to see the Canyon because it was quickly filling in with fog and might not be visible within the next 15-20 minutes at the rate the weather was rolling in.  Gah!

We took her advice and got our hustle on and bolted straight to the rim.  While impressive and – photographically speaking – kinda cool with the mist & fog in the air, it certainly wasn’t what I pictured in my mind as a first impression.

First Impressions

Don’t get me wrong – I was thrilled to finally be there and recognized I had a few days’ stay for the weather to improve.  But, that first impression of the Grand Canyon wasn’t exactly what I thought it’d be.
The weather was steadily getting worse as the cold rain picked up in intensity, but we were able to walk around a bit along the rim to see if anything else was visible.  Unfortunately, the ranger was right – it didn’t take long for the Canyon to fill in with fog and ick to become a sea of soupy white blah.

Without the Canyon to distract us with its beauty, I kept my eye out for any little quick shots I could grab with my phone in the wintry rain.  That’s when we came across this scenic locator.  It looked old, and from the inscription on it, it was.

Old School Sight Seeing

We couldn’t quite figure out how it worked until the next day when we ran into some simple devices on the trail that were metal tubes that locked into a notch to direct your eye towards a point of interest.  It didn’t magnify it at all.  It just got your eye pointed in the right direction when the tube rested on a preset notch.  We suspect this locator once had one of those tubes and you’d rest it on those notches to see the sights each slot pointed you too.  What a magnificently simple, clever solution!

So that was my lackluster first impression of the Grand Canyon.  I wasn’t going to let it get me down as we would be in the park for a few days.  It was bound to get better – I just had to wait a little bit longer and hang onto that optimism bubbling away in my mind.

– JC

A Love That Runs Deep

My love for Penn State hockey runs deep.  Very deep.  It stems from my 4 years of doing radio play-by-play for the men’s club team during my college days, calling 2 national championships along the way.

When you work with a team, you spend a ton of time with them.  You travel with them, kill a lot of time at a hotel or rink waiting for games to start, and hours upon hours upon hours on buses just getting to the games.  Ultimately you form a little family.  Even supporting staff like myself form a bond with the team – naturally not as deep as if you were a player yourself – but a bond nonetheless.

For years and years, the Penn State hockey family knew we had what it would take to become a scholarship varsity team and the community to support it.  The one thing we didn’t have was enough money. Funding was needed to build a new facility and seed endowments for scholarships and other costs, so we’re not talking chump change.

Then lo and behold… that dream came true in 2010 when the Pegula family made a massive donation to Penn State to make Penn State varsity hockey – for both the men’s and women’s teams – a reality!  That donation provided everything PSU needed to build that new arena and put the supporting pieces in place to get the teams on their way.

The team started varsity play with the 2012-2013 season, so we were able to make the trip to to PSU for a handful of games that first year.  Heading to PSU for a hockey weekend – for either club or varsity play – always provided a nice excuse for us to get away.  The games were always good and slipping away just for a weekend gave us the quick change of scenery that we often needed.

During those weekend trips to see games, we watched the Pegula Ice Arena take shape.  We saw it go from a parking lot, to a hole in the ground, to a steel skeleton, to its shiny glass and brick facade.  We simply couldn’t wait to get inside for a game!  But then we had a little hiccup with those plans – we moved to Colorado…

We left Pennsylvania in July 2013 and the new barn opened in October 2013, almost 3 months to the day after we moved out west permanently.  (Figures!)  Living 1500 miles away from State College instead of just 170 made getting to games a tad more involved, so we hadn’t been back since the move… until this fall!  Even though we had to delay the trip a couple of times, it was so worth it!

As chance would have it, a friend of mine from back in my play-calling days still works with the team (lucky!). Turned out he was going to be at the rink for meetings during the first day of our stay, so he offered to give us a behind-the-scenes tour.  He knew I’d be floored by the new facility compared to our old one.  He was so right!

To say I was amazed is a massive understatement!  Walking through the doors of the building for the first time was one thing.  Going out into the seats to see the rink for the first time was a little overwhelming.  So many feelings stirred seeing that this pipe dream is now an everyday reality for PSU. It’s hard to find words to describe all of the emotions that hit me.

My First Look at Pegula

I kept myself together through all of those emotions (yes!) and the tour was awesome!!  The facilities available to the athletes are stunning.  The technology improvements alone in terms of tracking your training and the different tools available blew me away.

Our seats for the weekend series of games were rinkside along the boards, so my friend took us up to the last row of the student section – now called “The Roar Zone” – to check out the view.  (In my day, the student section was simply called “Section E”, named after the seating section where the students sat.)  The Roar Zone was designed so it has the steepest incline allowable by building codes, making it very imposing to the visiting goaltender that guards that net in the 1st & 3rd periods of each game.  It also means the acoustics help the student chants and taunts rain down even harder on the guest netminder.  (Well done!)

The steepness is no joke, but once we got up there, the view was just something I wanted to soak in.  Since it was a non-gameday afternoon, the rink was empty.  It gave me a chance to get a little beauty shot of an empty arena (though I wasn’t able to get the shot with a freshly-zamboni’d surface to make it look shiny and new).  Can’t complain though!

Imposing Student Section

There’s a bunch of great displays around the concourse of the arena featuring all kinds of PSU hockey history.  There’s a display showing every guy and gal who wore every number for the PSU teams during both the club and varsity eras.  There’s a bunch of interactive displays were folks can dive into the team histories in more detail.  And of course there’s other memorabilia exhibits along the way featuring sticks, skates, sweaters, moments in program history, and so on.

My favorite display might be the one I have a teensy personal connection to – the rink board that a bunch of the hockey family signed to commemorate the elevation to varsity and the dawn of the new era for Penn State hockey.  I was lucky enough to sign that board years ago, so there’s a little piece of me in the new building even when I can’t be there in person.

Signed It

The last stop of the tour involved seeing some hardware… the B1G Conference Championship trophy we won in 2017.  Our first!  (That conference championship was a bit of a surprise/upset win t’boot.)  I never thought I’d live to see our hockey teams be elevated to varsity status, so seeing the trophy was another one of those little surreal moments for me.

Hardware

I wanted to get more pictures of the trophy, but that photo session was interrupted because the men’s head coach happened to come down the hall and my friend introduced us to him.  It was very cool to finally meet the coach after all of these years.  For having just met someone with a connection to PSU hockey’s history (little though it may have been), he was great with us.  In those few minutes we chatted with him, I could easily see how the guys on the team would skate through a wall for him and why he’s been able to make the men’s program such a success so quickly.

Getting that tour was more than we ever could have asked for on this trip!  (Thanks again to my friend – you know who you are!)  It was an absolutely fabulous way to start our hockey weekend, and the games were yet to come!

The weekend slate of games were set for Friday and Saturday night.  I didn’t take too many pictures during the games since I was too busy cheering and going wild.  And naturally, our seats were “terrible”.  (Sarcasm fully intended.)  It’s been a long time since I got to get that excited in-person at a PSU hockey game, and I enjoyed the hell out of every second of it!

Terrible Seats for the Game

Penn State won one game and lost the other one in overtime, so a good result in spite of us being in the building.  (Whenever we attend games of teams that we love, we’re usually a huge jinx and they lose when we’re in the building.)  We even saw one of the most amazing goals I’ve ever seen in person at a game – so good it made ESPN SportsCenter’s top 10 plays that night and was ultimately their #2 play for all of November!!

I’d say our hockey-centric Penn State trip was a roaring success!!  (Pun intended?  Yeah, at least this time anyway.)

We Are!!

– JC